How to Automate Client Onboarding
Step-by-step guide to automating client onboarding: forms, welcome emails, folders, tasks, CRM updates, and follow-up reminders.
Client onboarding is one of the easiest business processes to automate because it usually follows the same pattern every time.
A new client says yes. You need to collect information, send documents, create tasks, update your CRM or spreadsheet, notify your team, and make sure nothing is forgotten.
The problem is that many businesses still do this manually.
That creates delays, missed emails, messy folders, forgotten tasks, and a bad first impression for the client.
In this guide, you will learn how to automate client onboarding step by step, what tools you can use, what the workflow should include, and what mistakes to avoid before you build it.
Want to build this faster? Describe your onboarding process in AutomationsRecipe and generate your automation recipe with a visual workflow, setup steps, tool instructions, and testing checklist.
What Client Onboarding Automation Means
Client onboarding automation means using software to handle the repeated steps that happen after someone becomes a client.
Instead of manually sending the same email, creating the same folder, adding the same tasks, and updating the same spreadsheet every time, you create a workflow that does it for you.
A simple client onboarding automation can:
- Send a welcome email
- Collect client information through a form
- Create a client folder
- Add the client to a CRM or spreadsheet
- Create internal tasks
- Notify your team
- Schedule reminders
- Request missing documents
- Send next-step instructions to the client
The goal is not to remove the human relationship.
The goal is to remove the repetitive admin work so the client gets a faster, clearer, and more professional onboarding experience.
Who Should Automate Client Onboarding?
Client onboarding automation is useful for any business that signs new clients and repeats the same setup process. This includes agencies, consultants, freelancers, coaches, accountants, bookkeepers, designers, marketing teams, local service businesses, real estate teams, software and SaaS businesses, and B2B service providers.
If your onboarding process involves emails, forms, folders, tasks, spreadsheets, CRM updates, or team notifications, it can probably be automated.
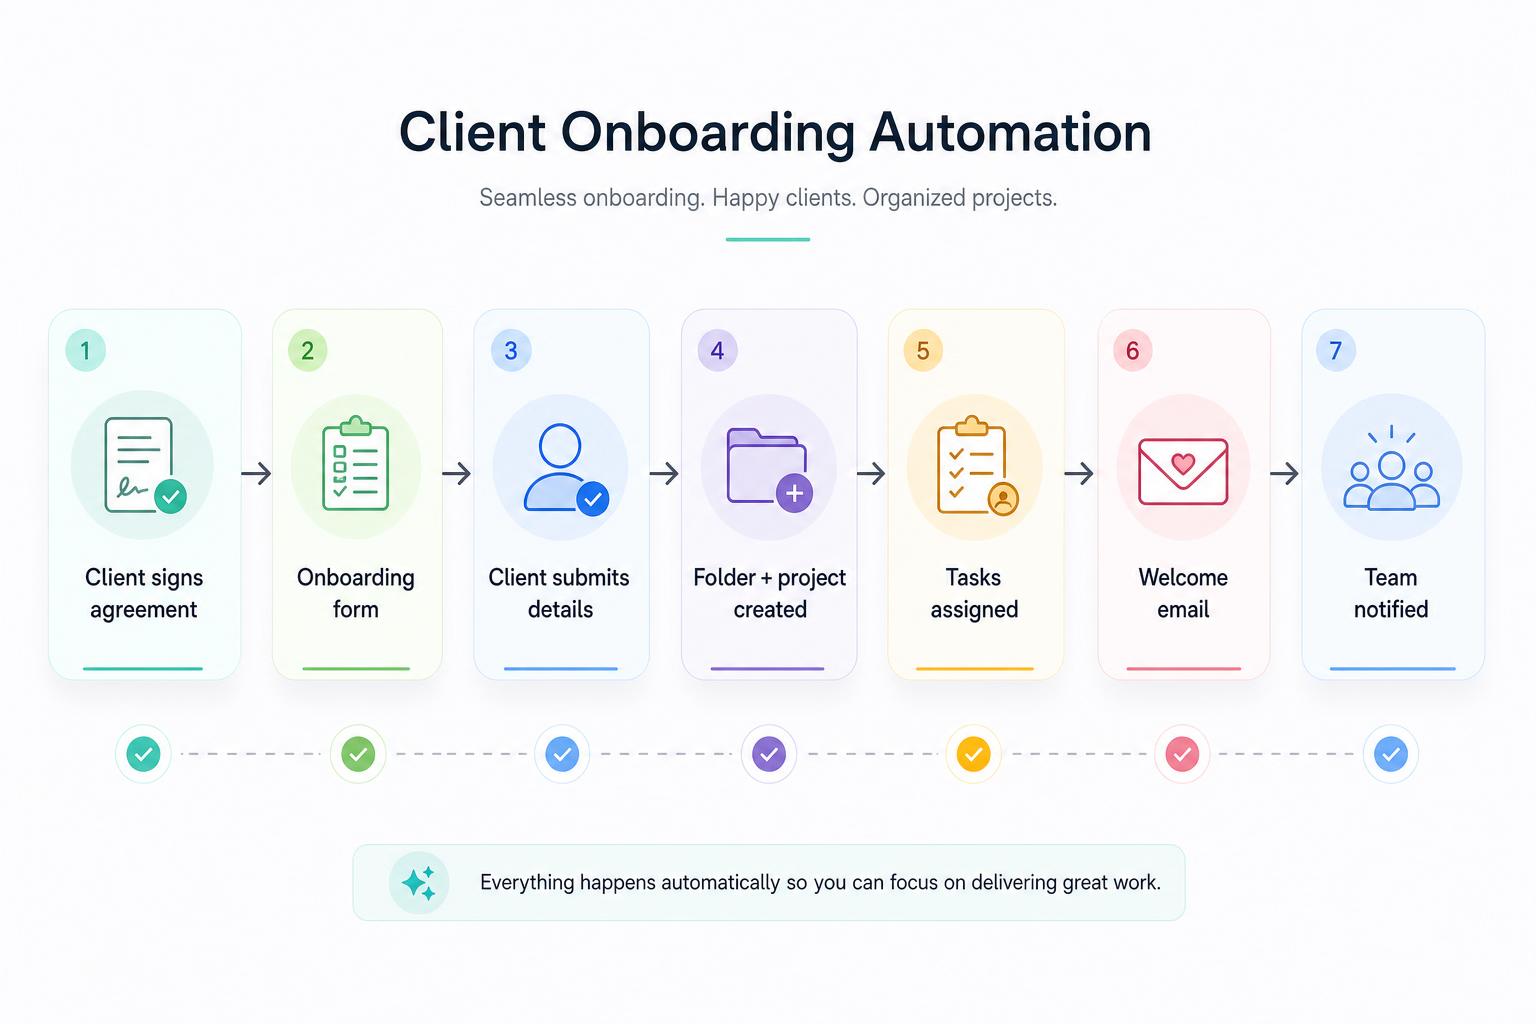
The Basic Client Onboarding Workflow
A simple automated client onboarding workflow usually looks like this:
- A client signs up, books a call, pays an invoice, or submits a form.
- The automation creates or updates the client record.
- The client receives a welcome email.
- The client receives an onboarding form.
- The submitted information is saved in a CRM, spreadsheet, or database.
- A project folder is created.
- Internal tasks are created for your team.
- The team receives a notification.
- Follow-up reminders are scheduled.
- The client receives the next steps.
Step-by-Step: How to Automate Client Onboarding
Step 1: Choose the Trigger
Every automation starts with a trigger. The trigger is the event that starts the workflow. For client onboarding, common triggers include:
- A new form submission
- A new payment
- A signed contract
- A new CRM deal marked as won
- A new calendar booking
- A new row added to a spreadsheet
- A manual button click inside your automation tool
For example, if you use a form, the workflow can start when a new client submits the onboarding form. If you use a CRM, the workflow can start when a deal is moved to “Closed Won”. If you use a payment tool, the workflow can start after a successful payment.
Best practice: Choose a trigger that confirms the client is actually ready to be onboarded. Do not start the full onboarding workflow too early.
Step 2: Collect the Right Client Information
Before you automate anything, decide what information you need from the client. This may include company name, contact person, email, phone number, website, billing details, project goals, login details or access instructions, brand assets, files and documents, preferred communication channel, and a deadline or start date.
Keep the form simple. A long onboarding form can slow people down. Only ask for information you actually need to start the work.
Good onboarding automation depends on clean input. If the client submits incomplete or unclear information, every next step becomes harder.
Step 3: Save the Client Data Somewhere Organized
After the client submits the form, the automation should save the information in one central place. This could be a CRM, Airtable, Google Sheets, Notion, ClickUp, Monday.com, HubSpot, a database, or a project management tool.
The important thing is that your team should know where the client data lives. Avoid spreading client information across emails, chats, forms, spreadsheets, and random documents. One clean client record is better than five disconnected places.
Step 4: Send the Welcome Email Automatically
The welcome email is one of the most important parts of client onboarding. It should make the client feel confident that everything is organized.
A good automated welcome email can include a short thank-you, confirmation that onboarding has started, what happens next, an estimated timeline, a link to the onboarding form, a link to book a kickoff call, the contact person, a support email, and any documents the client needs to prepare.
Example welcome email structure:
Subject: Welcome to AutomationsRecipe — here are the next steps
Body:
Hi [First Name],
Welcome aboard. We are excited to start working with you.
The next step is to complete your onboarding form so we can collect the information needed to prepare your setup.
Once the form is completed, we will review the details and follow up with the next steps.
You can complete the form here: [Form Link]
Best,
[Your Name]
Keep this email short, clear, and reassuring.
Step 5: Create the Client Folder Automatically
Many businesses need a folder for each client. This could be inside Google Drive, Dropbox, OneDrive, Notion, ClickUp, or a project management workspace.
Your automation can create a folder using the client name or company name. Example folder name: [Client Name] - Onboarding - [Month Year].
Inside the folder, you can create subfolders like Contracts, Brand Assets, Invoices, Project Files, Reports, and Meeting Notes. This helps your team stay organized from day one.
Step 6: Create Internal Tasks
Once a new client is onboarded, your team usually needs to do several things: review the client form, check the contract, confirm payment, prepare the kickoff call, create a project board, assign an account owner, request missing documents, and prepare the first deliverable.
Instead of creating these manually, your automation can create tasks in a project management tool. Each task should have a clear title, owner, due date, priority, client name, link to the client record, and link to the client folder.
A task without an owner is easy to ignore. A task without a due date is easy to delay.
Step 7: Notify the Right People
Your automation should notify your team when a new client is ready. The notification can go to Slack, Microsoft Teams, email, a project management tool, or a CRM activity feed.
A simple team notification can include the client name, service type, start date, folder link, and the next action (for example, “Review onboarding form”). This helps your team react quickly without searching for information.
Step 8: Add Conditions and Approval Steps
Not every client should follow the same onboarding path. Some clients may need extra approvals, different documents, or different task lists. For example, high-value clients may need manager approval, e-commerce clients may need Shopify access, B2B clients may need CRM setup, local businesses may need appointment reminders, and clients missing documents may need follow-up emails.
This is where filters, conditions, paths, or routers become useful. For example, if the client selects “E-commerce”, create Shopify setup tasks. If the client selects “Local Business”, create appointment and review request tasks. If the client did not upload required documents, send a missing document reminder.
Step 9: Add Follow-Up Reminders
A good onboarding workflow should not stop after the first email. You should also automate reminders for missing actions:
- If the onboarding form is not completed after 2 days, send a reminder.
- If documents are missing after 3 days, notify the account owner.
- If the kickoff call is not booked after 5 days, send another reminder.
- If the internal review task is overdue, notify the team lead.
Follow-up reminders prevent new clients from getting stuck and reduce the need for manual chasing.
Step 10: Test the Workflow Before Using It With Real Clients
Before using your onboarding automation with real clients, test it with fake client data. Check that the trigger works, the form data is captured correctly, the email looks professional, the folder is created with the right name, tasks are assigned to the right people, notifications include the right information, conditional paths work correctly, reminders do not send too early or too often, no duplicate emails are sent, and nothing breaks if a field is empty.
A workflow that looks good on paper can still fail if the data is messy. Always test before publishing.
Best Tools for Client Onboarding Automation
You can build client onboarding workflows with different tools depending on your needs.
Easiest for beginners. One trigger plus a few actions.
Routers, filters, and conditional paths.
Self-hosting, AI steps, custom logic, error handling.
Zapier
Zapier automation guides are a good choice for simple onboarding workflows. It works well when your workflow is mostly one trigger, a few actions, simple filters, app-to-app connections, and basic follow-up steps.
Example Zapier workflow: New Typeform response → Create HubSpot contact → Create Google Drive folder → Send Gmail welcome email → Create Trello card → Send Slack notification.
Zapier is often easier for beginners because the workflow structure is simple.
Make
Make.com automation guides are a good choice when your onboarding workflow has more steps, branches, or visual logic. Use Make when you need multiple paths, routers, filters, different onboarding flows for different client types, data formatting, and more control over how information moves between apps.
Example Make workflow: New onboarding form → Search CRM → Create or update contact → Router by service type → Create matching project tasks → Create folder → Send welcome email → Notify account owner.
Make is especially useful when the onboarding workflow needs to branch depending on the client type.
n8n
n8n workflow guides cover more advanced or technical workflows. n8n can be useful when you need flexible workflow logic, self-hosting options, advanced data handling, API connections, AI steps, internal business workflows, and custom error handling.
Example n8n workflow: Webhook receives new client data → Validate fields → Create CRM record → Generate AI onboarding summary → Create tasks → Send email → Log the process → Notify team.
n8n is usually better for users who are comfortable with more technical workflow building or who need deeper customization.
Example Client Onboarding Automation
Here is a practical onboarding workflow for a small agency.
Scenario
A marketing agency signs a new client. The agency needs to collect client details, create a client folder, create a project board, send a welcome email, notify the team, schedule a kickoff call, and track missing documents.
Workflow
Trigger: New client submits onboarding form.
Actions:
- Save client details in Airtable.
- Create a Google Drive folder.
- Create a project in ClickUp.
- Create onboarding tasks.
- Send welcome email through Gmail.
- Send Slack notification to the team.
- Wait 2 days.
- Check if required documents were uploaded.
- If documents are missing, send reminder email.
- If documents are complete, notify the account owner.
Result
The client gets clear next steps. The team gets notified. The project setup starts immediately. The business avoids manual admin work.
Common Client Onboarding Automation Mistakes
Mistake 1: Automating Before the Process Is Clear
Do not automate a messy process. First, write down what should happen manually. Then automate the repeated steps. If the process is unclear, automation will only make the confusion happen faster.
Mistake 2: Asking for Too Much Information
A very long onboarding form can slow down the client. Start with the information you need now. You can collect extra details later.
Mistake 3: Not Adding Conditions
Not every client needs the same onboarding path. Add conditions for different services, client types, document requirements, or project sizes. For more ideas, see our sales and CRM automation guides.
Mistake 4: Forgetting Internal Notifications
Do not only automate client-facing emails. Your team also needs to know when a new client is ready.
Mistake 5: No Error Handling
If something fails, someone should know. Add a notification when important steps fail, especially folder creation, CRM updates, task creation, or email sending.
Mistake 6: No Testing
Always test the automation with sample data before using it with real clients. Testing prevents embarrassing mistakes.
What You Should Automate First
If you are starting from zero, do not automate everything at once. Start with this simple version:
- New client form submitted
- Save client details
- Send welcome email
- Create internal task
- Notify the team
Once that works, add folder creation, CRM updates, conditional paths, follow-up reminders, missing document checks, approval steps, and AI summaries. Start simple. Then improve the workflow. You can find more ideas in our operations and admin automation guides and the full library of automation guides.
How AutomationsRecipe Helps
AutomationsRecipe helps you plan the workflow before you build it. Instead of guessing which tool, trigger, action, filter, or condition you need, you can describe your onboarding process in simple language.
For example: “I want to automate client onboarding for my agency. When a new client fills a form, I want to save their details, create a folder, create tasks, send a welcome email, and notify my team in Slack.”
AutomationsRecipe can turn that into a visual workflow, trigger and action steps, tool suggestions, AI prompt suggestions, setup instructions, a testing checklist, error-handling notes, and an exportable workflow guide.
Build your client onboarding workflow with AutomationsRecipe. Describe your process and generate your automation recipe you can follow step by step.
Final Checklist
- The trigger starts at the right moment
- The onboarding form collects the right information
- Client data is saved in the correct place
- Welcome email is clear
- Folders are created correctly
- Internal tasks have owners and due dates
- Team notifications include useful information
- Conditions work for different client types
- Follow-up reminders are not too aggressive
- Failed steps notify someone
- The full workflow has been tested with sample data
Frequently Asked Questions
Generate your automation recipe
Use AutomationsRecipe to generate a visual workflow, setup steps, platform instructions, and testing checklist for your exact business process.